Sunday, November 11, 2018

Recess Reimagined


Ah, indoor recess . . . every teacher’s favorite, am I right?

Yeah, no.

First, there’s the noise, and the semi-chaos, and all that pent-up energy that still isn’t going anywhere (except around and around your classroom and eardrums).  Then, there’s the “recess shelf,” which varies by classroom and teacher but never seems to have enough of anything.  Not enough games, not enough pieces (!) for those games, not enough of what my kids want (“Why don’t you have Legos?  My first grade teacher had Legos!” “Where are the iPads?  My last school had iPads!”), etc.

After more than a dozen years at my current school, my recess shelves were a mess.  I had games.  Lots of games.  But very few games had all the pieces:
  •       Battleship had five ships left.  Total.  To split between two players. 
  •       Chinese Checkers had 7 red marbles, 5 blue, and fewer of all the other colors, and each color is supposed to have 10. 
  •       Ever played Marble Run without the marble?  Yeah.  Fun times.
  •       So you’re getting the idea.


So last year, when I packed up the shelf for summer (because we don’t want those pathetic games getting lost during summer cleaning, do we?), I vowed to throw most of them away and buy new games.  But time was short, and summer loomed, so I just packed them up until fall.

And then this summer I discovered STEM bins.  I found an awesome resource, bought the materials, and set them up.


I also stopped at two Targets on our trip back from Canada and bought a total of 36 bags of fake Legos in the Dollar Spot.  (I put the Legos into four small plastic bins – rather than one big bin – because I thought it would be easier for more kids to play with them.  Happily, that turned out to be a brilliant decision.)


And when I unpacked my classroom and set it up in August, I did NOT put most of the games back on the recess shelves.  I put about 6 games and a few activities on the shelves but left an entire shelf and a half empty for my new STEM bins and Legos.

I put those brand new Lego tubs and brand new STEM bins on the recess shelves with great trepidation.  Because, you know, second graders.  (Does anything still look quite so shiny and new after a week with second graders?  Nope.)


And then I took the brand new STEM bins off the shelf again.  I just couldn’t leave them there.  Because, you know, second graders.

On the morning of the first day that would be indoor recess, I sat my new class on the rug and introduced five of the STEM bins.  I showed them each bin, demonstrated how to use the contents if it was even remotely a new idea (index cards, pipe cleaners and straws, cups . . .), and explained the rules:
  •       STEM bins MUST be used on desks or tables, NOT on the floor (where the bin might get stepped on and broken).
  •      All structures must be taken apart at the end of recess and all materials must be returned to the STEM bin.
  •      Have fun.


The kids were absolutely entranced.
Recess – INDOOR recess – was a dream.


So a few weeks later (we don’t get much rain here, apparently), I introduced the other five STEM bins.  And a few weeks after that, I introduced the building cards that came in the resource.


My kids can still read or draw at recess.  They can still crawl around on the floor pretending they’re a family of puppies (or was it kittens?).  They can still play the math games that I’ve introduced during math time, or work on unfinished work in their folder.  They still can’t use their Chromebooks.  But now they can STEM, and it’s golden.


Thanks to Highlights and Puzzlemania, I have one more pair of bins to introduce.  Highlights offered KEVA planks this year in their magazine offer for teachers (send home their advertisement, get parent signatures, redeem those signatures for rewards) and we had enough responses to get KEVA planks through both Highlights and Puzzlemania. 

The planks arrived this week.  I put them in their bins, and they’re waiting patiently to be introduced to my class.


I am waiting excitedly to introduce them to my class.

Because, you know, second graders.


Wednesday, August 10, 2016

Easy, practical, CLEAN bathroom passes - a freebie!

I teach second grade.  They do NOT always remember to wash their hands.  So bathroom passes, which are a necessity in the elementary classroom, have always grossed me out.


  • If it's something the kids carry to the bathroom, where do they put it while they're there?
  • If it's something they wear - like a lanyard or clip - there's a lot of touching involved (put it on, take it off). 
  • If it's something they leave on their desk so the teacher knows they're missing from the room, they still have to touch it. 
  • And remember, they don't always wash their hands.  No matter how many times I remind them.  (Lots, btw.)
  • So just, ew.


Then I saw this idea on Pinterest a few years ago, the lightbulb went off, and I've used it ever since:


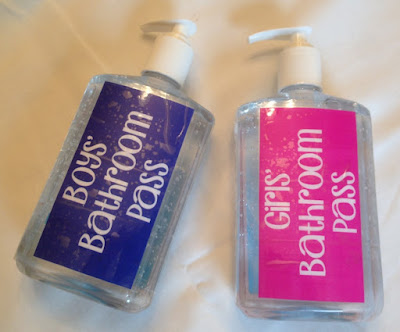
The child places the hand sanitizer bottle on his/her desk and leaves the room.  When he/she returns, the bottle gets returned to its place on my desk - at which point the child dispenses a pea-sized amount and rubs it in on the way back to their desk.

Voila.  All my OCD problems solved. ;)

  • The bottles live on my desk by the tissues, so after you throw your tissue away - hey, have some hand sanitizer.
  • That was an impressive sneeze!  Go wash your hands.  Or have a squirt.
  • I DO stop the girls who want to wear it as perfume, and I DO have a stern talk with the class once someone discovers that a squirt of Purell on a tissue easily wipes their Sharpie name off their desk.  But all in all, I think it's a win. :)

You can pick up the labels in my TpT store for free!  You'll have to buy your own Purell bottles ;) but they tend to be in the back-to-school sale sections in most stores right now.  And I'm sure these labels will work with other brands of hand sanitizer; I just like the squareish shapes of the Purell bottles.

Step one: measure the label on your bottles and print the page you need:


Step two: cut and laminate:


> I took this picture before laminating, but I DO laminate them because if I need to switch bottles midway through the year, I can just peel off the tape and reapply the same labels to a new bottle.  I plan to refill the bottles as the year goes on, but sometimes they get dropped and cracked, and I am stingy with my ink. ;)

Step three: use sealing or packing tape to wrap entirely around the label on both sides of the bottle.  Having each bottle two-sided means that no matter which way it gets left on the desk, you can tell quickly and easily where the girls' pass is and where the boys' pass is.


This year, I bought bigger Purell bottles (whoops) and had to make bigger labels.  The freebie in my store has both sizes; measure your bottles and only print the page you need.

Happy (clean) teaching!


Saturday, August 6, 2016

The best pencil sharpener EVER!

Well.  Am I ever a happy camper!

A couple of years ago, I solved the pencil problem in my classroom.  No more kids sharpening their pencils all day long.  No more kids saying they didn't have a pencil, or an eraser, or they couldn't find their whiteboard marker . . . nope, all those problems solved.

Well, mostly. ;)

Because they still had colored pencils to sharpen sometimes.

And I still had to sharpen all of their regular pencils at the end of each week with my noisy, messy electric sharpener.  And the bigger the class, the longer that took.  Since I'm looking at having TWO groups of students this year, a morning class of 25 and an afternoon group of 18, that's a LOT of sharpening time for me.  

And then, voila, a solution arrived in the mail.

Classroom Friendly Supplies sent me this pencil sharpener:

So cute!!


I bought some cheap pencils (hey, if we're going to test a new tool, let's make it a REAL test - no Ticonderoga pencils here!):


And I sharpened.  The pencil gets clamped in (so the SHARPENER is holding the pencil, not me - or the students - which means the pencil is getting pressed against the blades with just the right amount of force AND no one is holding onto that sharp metal eraser-holder end and getting cut) and then you just turn the crank:


And whoa.

I mean, WHOA.

First of all, talk about a perfect point:


Second, the pencil sharpener doesn't take off ANY extra lead.  You know how you sharpen half of your new pencils, stack them up again with the unsharpened pencils, and they're shorter?  Not anymore.  Note that the erasers are aligned and so are the tips:

This is the same photo as above - I didn't move the pencils between shots.
The erasers are still aligned and, as you can see, the tips are the same length as the unsharpened pencils!

Third, and this didn't hit me until the second pencil that I sharpened, I realized I was doing something reflexively that didn't need to be done with this sharpener: blowing the dust off the freshly sharpened pencil.

Because there was no dust.

These pencils came out perfectly clean.  

That just doesn't happen, people.  How do you sharpen a pencil and NOT have sawdust shavings or little lead flakes?  I have NEVER taken a pencil out of a sharpener that was perfectly clean.  In the picture above, I blew on one of the pencils (habit!) and didn't blow on the rest - I just took them out of the sharpener, squealed happily, and lined them up with the others.  Betcha can't tell which one got special treatment, because I can't!

So now I have this wonderful tool and a new classroom job: PENCIL SHARPENER.  I removed that job when I instituted the pencil pouches a couple of years ago, but now that I'm going to have 43 pouches to sharpen each week, I'm going to make it a student job.  

And now the students have the perfect tool with which to do their job: my happy new pencil sharpener.

I plan to buy more of these and let children share this job.  I want to get a 3-pack of sharpeners for about 30% off, which is kind of like buy two, get one free - then I'll have four in my classroom, which would be perfect for my class sizes (and my new helpers!) this year.  I'm thrilled!

You can check out Classroom Friendly Supplies and get one or more for your home or classroom, too.  I promise you will LOVE this pencil sharpener!


Sunday, July 31, 2016

TpT sale Monday and Tuesday!


I'm so excited - tomorrow is the TpT back to school sale!  I already have $140 worth of products in my cart, so I'm ready to check out first thing tomorrow morning! :)

I have spent this summer working on some math activities for next year, and today I managed to get two of them up in my store.  These are "algebra" stations for elementary students (my second graders are always so impressed with themselves when I say we're going to do some algebra today!).  As teachers, we call it Operations and Algebraic Thinking, but what do we know. ;)

One of my favorite ways to keep things hopping during "routine math practice" activities is to create stations.  I've been using the idea of stations since my very first year teaching 22 years ago: I remember sending my kids around to measure whatever object I had placed by each station number.  Now, of course, things are a little more fancy.

So I have two resources in this series up in my store as of this evening: Level 1, which uses addition and subtraction facts to 20, and Level 2, which uses two-digit numbers.  Here's a peek at Level 1:


First, students get an answer paper.  There are sixteen of these.  Here's page 1 from Set 1:


Next, students get out of their seats (and see, right there, you've upped the interest level!) and go to each station to write down the station number.  Here are the first six stations in Set 1:

At each station, children write the station number in the top blank to make an equation.  So now, for A, their equation reads "1 + ? = 7" and they can write "6" in the answer space.  Then they move to B, write a 2 on the top blank, and determine the answer (3 = 2 + 1).

Here's the part I like: you get to use these station numbers, Set 1, FOUR times.  There are four different student pages that use those cards.  Less printing with color ink!  

Or you could use the black and white version of the station cards that is provided.

Or you could just display that page of the pdf on your screen, have the kids fill in those six station numbers, and work through one row at a time together, with partners, as a warmup each morning for a week . . .

So many choices! ;)


And when you're ready, you move on to Set 2:


and to the Set 2 student papers:

See how the station letters on the student pages match the letters on the station number cards?  Yeah, somebody had fun with fonts. ;)


But maybe you teach third or fourth grade and this is too simple.  The first week of school might be a good time to review two-digit equations instead of basic facts, so you'll want Level 2:
Watch your students enjoy solving for the unknown number in these Missing Number Mysteries! Low prep centers, scoot, or assessment pages help children practice their addition and subtraction facts with two-digit numbers as they work on  and 2.NBT.B.5. Great for second and third graders working on building number sense!  #secondgrade #solvefortheunknown #math #balancedequations #basicfacts #commoncore

Level 2 has its own FOUR sets of station cards, like this one:

with corresponding student pages (front and back this time, so they have some room to show their work - or to figure out the answers!):


Oh, and everything comes with an answer key:


Again, four sets of station numbers, with four student pages for each set.  Yes, 480 equations - and they're all unique.  There are no duplicates in Level 2; students will solve "65 = 21 + 44" (station DD above) but will not encounter the other equations in that "family":

  • 65 = 44 + 21
  • 21 + 44 = 65
  • 44 + 21 = 65
  • 65 - 21 = 44
  • 65 - 44 = 21
  • 44 = 65 - 21
  • 21 = 65 - 44
Every equation is different.  And yes, I kept track.  And yes, that got a little time-consuming by the end of Set 4. ;)


I'm still working on Level 3, which will be three-digit numbers.

Then comes Level 4, multiplication and division facts (I'm really excited about that one because a teacher in my school asked for it when she saw my kids working on a level 2 page the last week of school!).

And eventually, I'll make a "Second Grade bundle" (levels 1-3, because we don't multiply in second grade in my district) and a "Complete bundle" (levels 1-4 for you folks who do it all).

Shall we take bets on whether or not I'll manage to get these all done before I go back to school in three weeks?  :)


Thursday, July 28, 2016

Five for Friday: a snake story


Many thanks to Kacey at Doodle Bugs Teaching for hosting this linky party each week - it motivates me to get my thoughts together! :)


Day 1 in the classroom this summer: I brought my husband and son to move the furniture.  I expected they'd stay for 30-45 minutes and bolt as soon as everything was in place.  But instead, they also:

  • helped me unpack my team's warehouse order;
  • moved a bunch of books onto bookshelves;
  • unpacked several boxes;
  • wiped all of my classroom chairs with Clorox wipes;
  • and kept asking, "What else can we do?"

They are saints! :)

After they left, I took a look at this bookshelf.  The bottom shelf holds half of my picture books that aren't in another category (e.g. nonfiction, poetry, author study).  It used to be so full that the kids literally could not get books in or out - and sometimes, I couldn't, either.  So I moved some elsewhere.


The last week of school last year, I had my kids take all the picture books off the shelves and sort them into piles on the desks.  I gave each child a sticky note with a letter of the alphabet to put on his/her desk, and then handed over a random armful of books.  They had to sort the books by author's last name (which was a fiendishly difficult task when the author wasn't listed on the cover of the book . . . we learned a lot about title pages and publication/copyright pages!).  

[This is a great activity for the last week of school, by the way.  They're physically active, mentally engaged, and they keep finding books they want to read - so when all the sorting is done, most kids are reading!]

I cut up some old file folders and made quick tabs so we could preserve our hard work.  And then I left it for the summer.  

And so now I have to figure out: 1) Do I just want to let all the books get mixed up again, and re-sort them in June, or 2) Do I want to figure out how to get my class to keep these books sorted by the author's last name?  And if we're going to keep them sorted by author (which is how my easy readers and chapter books are grouped, too) then what can I use as dividers?  Help!


An adventure at home:


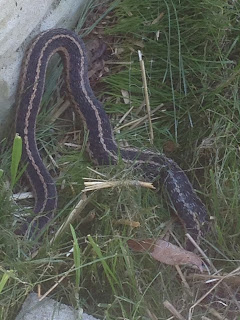
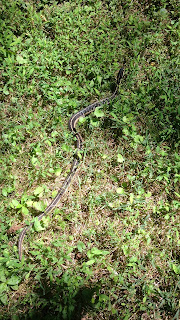
My husband found this snake beside the house.  It was 3-4 feet long, and I volunteered to help him move it.  (Or maybe I WAS volunteered.  By him.)  Anyway, I gave it a try but discovered the snake wouldn't let go, no matter how hard I pulled.  Then I realized that he had woven himself through the landscaping mesh protecting the new grass and was actually stuck.  

So then it got tricky - no more standing back with a long hook; now I've got to get up close and personal with this thing while wielding a pair of scissors.

I am not afraid of snakes, and my husband kept reassuring me (from a safe distance) that this one isn't venomous, but I AM a little leery of getting bitten.

So I went inside to get the scissors and came out in a parka and gardening gloves.  (Have I mentioned yet that it was 98 degrees that day?  The parka was a nice touch, I thought.)  I figured the parka would protect my arms and would be a much softer material for Mr. Snake to sink his teeth into than me.

I actually had to cut the mesh away from him in two places.  I was all busy congratulating both of us for surviving this scissors-against-scales experience, and pulling him away, when I realized he wasn't budging and I had to do it again.

Thankfully, other than wrapping his tail end around my hand and coating me with a foul-smelling liquid, he didn't protest much.  He held mostly still, even when I was clumsy with the scissors at the beginning, and he didn't open his mouth as if to bite at all.  (My husband reported that last bit from an even safer distance; I wasn't watching the mouth, just the scissors.)

When he was free, we herded him down the backyard and toward the woods.  He seemed to be just fine. :)


My daughter has been in camp the past two weeks: horseback riding, swimming, gymnastics, team sports, etc., all outside, all day.  There is actually no indoors area at this camp other than the horse barn, so she's been out in the 95 to 100 degree temperatures every day.  And she's fine.

We got to watch riding one day:


She was pleased as punch that on this one day, for a few brief seconds, while her family was watching, she was actually able to post correctly while the horse trotted. :)


I've been trying something new for breakfast lately.  I need something healthier for the mornings; last year, my go-to breakfast was an English muffin with peanut butter, a banana, and coffee.  

No, I'm not getting rid of the coffee.  That stays.

But I wasn't thrilled with the white bread English muffin.  And the whole wheat variety, just, ugh.

Enter YouTube.  Specifically, The Domestic Geek, who has some amazing food videos (and I am NOT a food video person, so that's quite an endorsement!).

Now I'm eating "overnight oatmeal," and it's COLD, and it has YOGURT in it, and if that's not enough to scare you off, then keep reading. :)  (Personally, the idea of cold oats kind of grossed me out.  And I will eat yogurt, but only because it's good for me, not because I particularly like it.  But then, this.)

After a few weeks, I've kind of refined my recipe.  Now I make the basic oats (1/3 cup of old fashioned oats, a little less than 1 tablespoon of chia seeds, 1/4 cup of Greek yogurt, and 2/3 cup skim milk because I do NOT like it sticky) and put them in the fridge overnight.  Separately, I cut up some fruit and put it in the fridge (you're supposed to put the fruit on top of the oats mixture, but as I said, I'm refining it here . . . ;)

The next morning, I dump the cut fruit into a bowl (here: mango, strawberries, blueberries):


Add a sliced banana (or half of a banana):


And pour the oatmeal mixture on top.  (Then I add about 1/3 cup of chopped walnuts - oh my goodness, that just makes it amazing.  It would have made this picture look amazing, too.  Believe me.)


As my husband says, "That looks . . . appetizing." 

;) 

You'll just have to trust me.  It's delicious.  And it's completely healthy.  And I am NOT hungry before lunchtime anymore.  In fact, some days, "What lunchtime?"  Win!


Not a Pokemon Go player, and I don't have a dog, but I thought this was hysterical.


Coming soon: a back-to-school tool you will NOT want to live without and a freebie!