Thursday, July 28, 2016

Five for Friday: a snake story


Many thanks to Kacey at Doodle Bugs Teaching for hosting this linky party each week - it motivates me to get my thoughts together! :)


Day 1 in the classroom this summer: I brought my husband and son to move the furniture.  I expected they'd stay for 30-45 minutes and bolt as soon as everything was in place.  But instead, they also:

  • helped me unpack my team's warehouse order;
  • moved a bunch of books onto bookshelves;
  • unpacked several boxes;
  • wiped all of my classroom chairs with Clorox wipes;
  • and kept asking, "What else can we do?"

They are saints! :)

After they left, I took a look at this bookshelf.  The bottom shelf holds half of my picture books that aren't in another category (e.g. nonfiction, poetry, author study).  It used to be so full that the kids literally could not get books in or out - and sometimes, I couldn't, either.  So I moved some elsewhere.


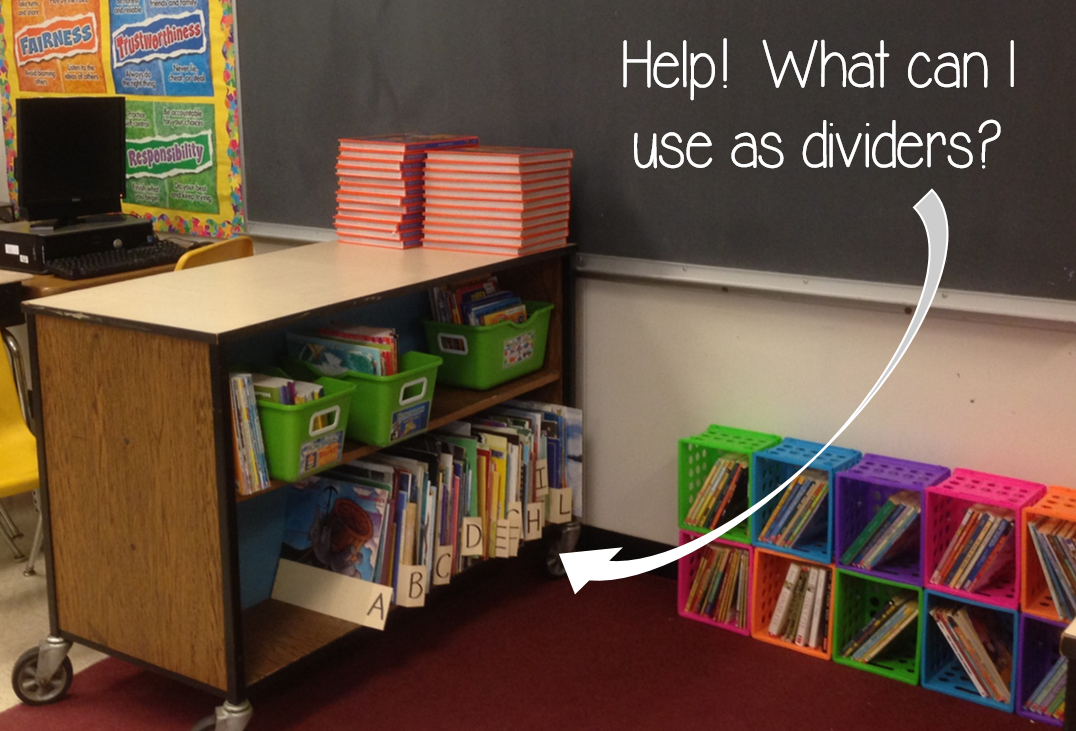
The last week of school last year, I had my kids take all the picture books off the shelves and sort them into piles on the desks.  I gave each child a sticky note with a letter of the alphabet to put on his/her desk, and then handed over a random armful of books.  They had to sort the books by author's last name (which was a fiendishly difficult task when the author wasn't listed on the cover of the book . . . we learned a lot about title pages and publication/copyright pages!).  

[This is a great activity for the last week of school, by the way.  They're physically active, mentally engaged, and they keep finding books they want to read - so when all the sorting is done, most kids are reading!]

I cut up some old file folders and made quick tabs so we could preserve our hard work.  And then I left it for the summer.  

And so now I have to figure out: 1) Do I just want to let all the books get mixed up again, and re-sort them in June, or 2) Do I want to figure out how to get my class to keep these books sorted by the author's last name?  And if we're going to keep them sorted by author (which is how my easy readers and chapter books are grouped, too) then what can I use as dividers?  Help!


An adventure at home:


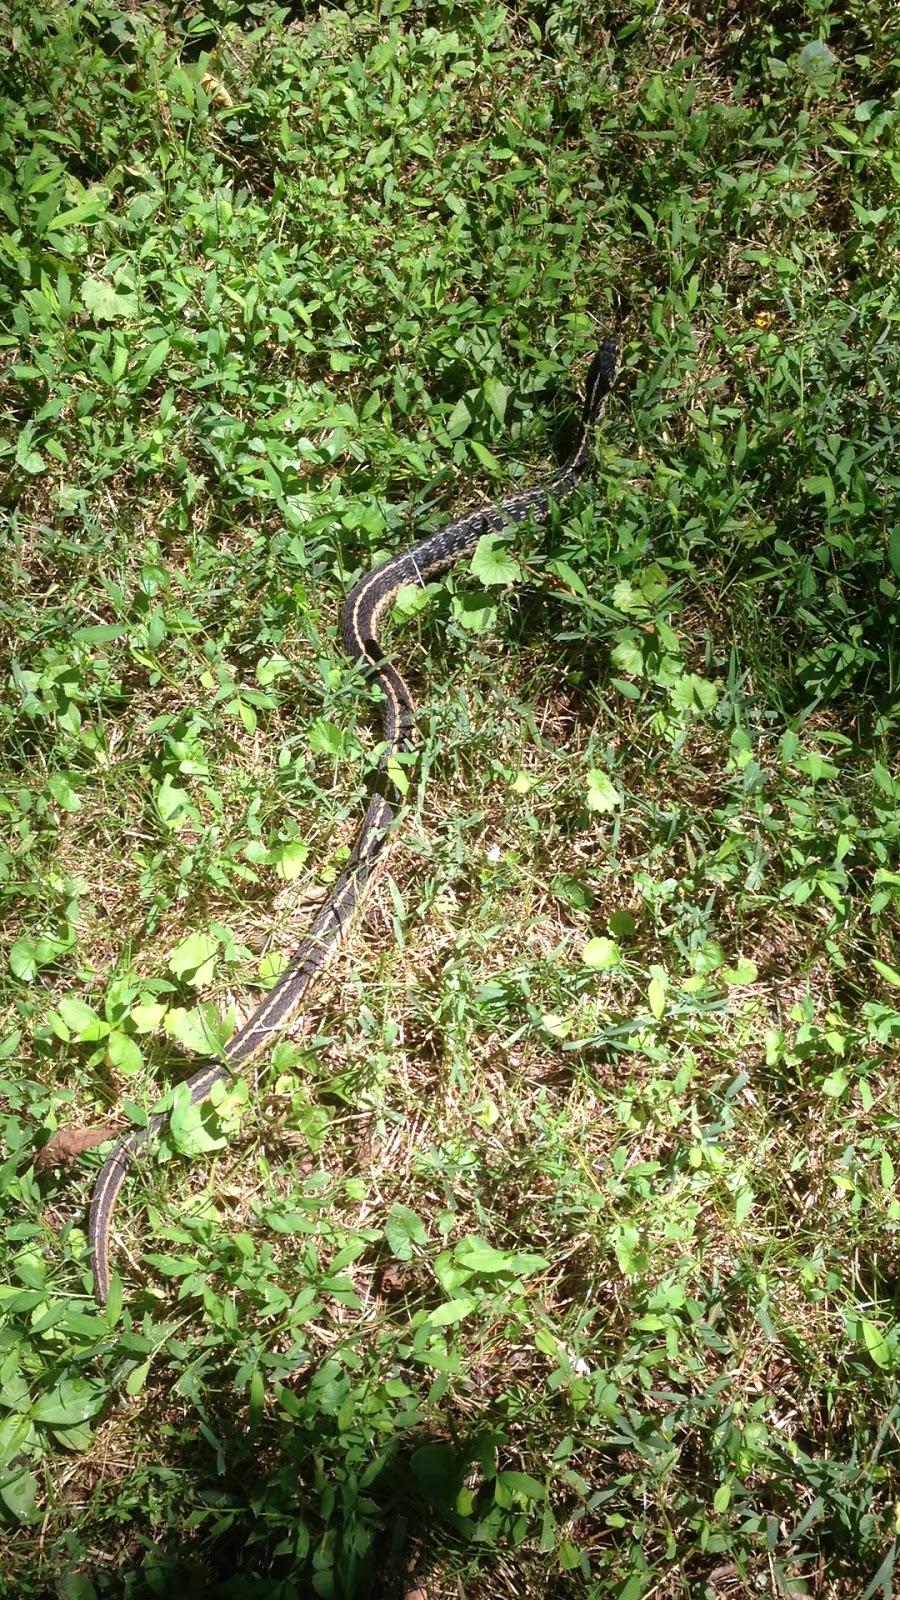
My husband found this snake beside the house.  It was 3-4 feet long, and I volunteered to help him move it.  (Or maybe I WAS volunteered.  By him.)  Anyway, I gave it a try but discovered the snake wouldn't let go, no matter how hard I pulled.  Then I realized that he had woven himself through the landscaping mesh protecting the new grass and was actually stuck.  

So then it got tricky - no more standing back with a long hook; now I've got to get up close and personal with this thing while wielding a pair of scissors.

I am not afraid of snakes, and my husband kept reassuring me (from a safe distance) that this one isn't venomous, but I AM a little leery of getting bitten.

So I went inside to get the scissors and came out in a parka and gardening gloves.  (Have I mentioned yet that it was 98 degrees that day?  The parka was a nice touch, I thought.)  I figured the parka would protect my arms and would be a much softer material for Mr. Snake to sink his teeth into than me.

I actually had to cut the mesh away from him in two places.  I was all busy congratulating both of us for surviving this scissors-against-scales experience, and pulling him away, when I realized he wasn't budging and I had to do it again.

Thankfully, other than wrapping his tail end around my hand and coating me with a foul-smelling liquid, he didn't protest much.  He held mostly still, even when I was clumsy with the scissors at the beginning, and he didn't open his mouth as if to bite at all.  (My husband reported that last bit from an even safer distance; I wasn't watching the mouth, just the scissors.)

When he was free, we herded him down the backyard and toward the woods.  He seemed to be just fine. :)


My daughter has been in camp the past two weeks: horseback riding, swimming, gymnastics, team sports, etc., all outside, all day.  There is actually no indoors area at this camp other than the horse barn, so she's been out in the 95 to 100 degree temperatures every day.  And she's fine.

We got to watch riding one day:


She was pleased as punch that on this one day, for a few brief seconds, while her family was watching, she was actually able to post correctly while the horse trotted. :)


I've been trying something new for breakfast lately.  I need something healthier for the mornings; last year, my go-to breakfast was an English muffin with peanut butter, a banana, and coffee.  

No, I'm not getting rid of the coffee.  That stays.

But I wasn't thrilled with the white bread English muffin.  And the whole wheat variety, just, ugh.

Enter YouTube.  Specifically, The Domestic Geek, who has some amazing food videos (and I am NOT a food video person, so that's quite an endorsement!).

Now I'm eating "overnight oatmeal," and it's COLD, and it has YOGURT in it, and if that's not enough to scare you off, then keep reading. :)  (Personally, the idea of cold oats kind of grossed me out.  And I will eat yogurt, but only because it's good for me, not because I particularly like it.  But then, this.)

After a few weeks, I've kind of refined my recipe.  Now I make the basic oats (1/3 cup of old fashioned oats, a little less than 1 tablespoon of chia seeds, 1/4 cup of Greek yogurt, and 2/3 cup skim milk because I do NOT like it sticky) and put them in the fridge overnight.  Separately, I cut up some fruit and put it in the fridge (you're supposed to put the fruit on top of the oats mixture, but as I said, I'm refining it here . . . ;)

The next morning, I dump the cut fruit into a bowl (here: mango, strawberries, blueberries):


Add a sliced banana (or half of a banana):


And pour the oatmeal mixture on top.  (Then I add about 1/3 cup of chopped walnuts - oh my goodness, that just makes it amazing.  It would have made this picture look amazing, too.  Believe me.)


As my husband says, "That looks . . . appetizing." 

;) 

You'll just have to trust me.  It's delicious.  And it's completely healthy.  And I am NOT hungry before lunchtime anymore.  In fact, some days, "What lunchtime?"  Win!


Not a Pokemon Go player, and I don't have a dog, but I thought this was hysterical.


Coming soon: a back-to-school tool you will NOT want to live without and a freebie!


Thursday, July 21, 2016

Five for - the last six months!


Okay, let's try this again.


See, first there was this:


That's an elbow brace for tennis elbow.  Because I play a lot of tennis. (*snort*)  No, because I -apparently- shouldn't spend too much time on the computer typing or mousing (is that even a word?).  

See, back in January, I was working on teaching my kids how to attack two-step word problems.  So I made a bunch for them (using their names and their interests), and they loved them.  Then I thought, "Hey, if I needed these, and if my kids liked CHOOSING their numbers, maybe other teachers would like to use them, too!"

So I worked it up for TpT.  Type, mouse, type, mouse, ouch, type, mouse, ouch, type, ouch, mouse, ouch, ouch, ouch.  But voila!

Each child chooses which set of numbers to use.  Want "easy" problems?  Circle the first three numbers, 14,6, and 12, and plug them into the blanks in the word problem in that order.  Want harder math?  Circle the second set of numbers.  Write your answer in a complete sentence on the lines provided!
Since these two-step problems are focusing on the problem-solving skills and the procedures necessary for solving a multi-step equation, I don't really care whether they're using "easy" or "hard" numbers; we do enough other computation tasks that it doesn't need to be a focus here.  I want them to be able to concentrate on the problem and how they're going to solve it, and not get stressed out by the math.  For some struggling students, being able to choose to do "easy math" is huge. :)


Several doctor appointments later (by which point the pain was constant and excruciating, and I couldn't use my arm, and let's not talk about how much OTC pain medicine I was taking), he said, "You have severe tendinitis.  You need to rest your arm.  Don't use it at all.  Here's a prescription for physical therapy."

And so I stopped using my arm.  And my right hand, which is attached to that arm.

No more typing.

No more mousing.

No more driving with the hand that knows how.


Hello, left hand.  Learn to type solo.  (Slow and frustrating.)

Learn to mouse.  (Awkward!)

Learn to drive.  (Yikes!  Exciting in a bad way.)


And eventually, thanks to rest, some good physical therapy, and more REST, I have less pain.  So I'm back. :)


I'm going to have a new teammate next year!  We've worked at this school together for 12 or 13 years now, but she's always taught first grade and I teach second  Next year, we'll finally get to work together!

I crocheted a baby afghan for her baby shower in May.  I had to choose a pattern that would work up quickly and not aggravate my elbow, and I really like how it came out:


The baby, of course, is ADORABLE. :)


One day in May, I gathered my students on the rug and asked if they'd like to see pictures of my new pet.

(Don't you just love it when you suddenly have 100% attention from 100% of the class?  Twenty one rapt little faces, eagerly guessing, "Is it a dog?" "I bet you got a cat!" "No, she's allergic to cats. It's a dog!")

Then that lovely moment of stunned silence when i showed them this picture on my phone:


("It's a BEE?!")

I explained that I had gone out onto the deck a couple of evenings ago to check the baby tomato plants.  I needed to transplant some of them into other pots soon, and I had to see if they were big enough yet.  Well, they weren't, but floating in the rainwater in one of the empty pots was a carpenter bee.

Now, we have these bees flying around our deck all the time in the summer.  My daughter named them last summer: Buzzy (the boy) and Fuzzy (the female).  (Like we can tell.)  They don't sting, because the bees who are out and about are males and they don't have stingers.  So we don't mind them.

And I felt horrible that one had drowned in our plant pot.

So I fished it out and brought it inside, and I put it at my daughter's place on the kitchen table, thinking she'd enjoy getting to see one up close the next morning.  I laid it on its back so she could see its legs and mouth parts - which we rarely get to see - when she came down in the morning.

And I forgot about it.

The next morning, I was eating breakfast at the table, sitting across from the dead bee, when she came downstairs, approached the table, and jumped back about six feet.  

"There's a BEE on the TABLE!"

"Yes," I said sadly.  "I found him outside.  He drowned in the water in the pot.  Poor thing."

"NO, MOM, HE'S MOVING!"

"No, honey, he's been there for" - checked clock - "eleven hours.  He's dead."

"NO, MOM, HIS LEGS ARE MOVING!"

So, being a good mom, I checked.

Well, lookee there, a leg moved.

(*panic*) (*I brought a bee into our house and left it unattended for 11 hours and it was ALIVE?!*)

So I very calmly scooped the bee into a bug observation box and it promptly looked very dead again.  Once it stopped moving, that is.

Later, we soaked a paper towel in sugar water and put it into the bug box (with the dead bee).

Later, I opened the bug box, tipped the (dead) bee over onto the paper towel, and quickly covered it up.  I had done some research by this point and learned that bees - like butterflies - can taste with their feet, so I figured if I made it stand on the sugar water, it would be able to find food.  If it ever became alive again, of course.

Later, I gave up any hope that the thing was going to live, and gave it way more sugar in the water, and took it outside where it was warming up, and hello, it got a little more active.

And then it drank, and that was just the coolest thing ever.


First, check out the little pink tongue!  It was all I could do not to coo at the way it lapped up the water from the towel.  Second, sorry about the video quality . . . but really, how cool is that? :)

And eventually, SHE flew away.  After she had a lot of sugar water and a little self-bath and I got a good look at her very long stinger.  (!)


Our school year ended on a half-day Monday.  It was supposed to be a half-day Friday the week before, but we had snow in January and missed a week of school, and you have  to pay for those little vacations, don'tcha know.

No, the shoveling probably didn't help the elbow.


So I gave the kids their end-of-the-year gifts BEFORE the last day of school, which just seemed wrong, but ended up being awesome.  Because I didn't have to do it the last day, when they're all slightly out of their minds. ;)


I always read The Mouse and the Motorcycle aloud to my class the last full week of school.  This is a yearly tradition for me, because then on the last day we can watch the movie, and then we can make a Venn diagram comparing the book and the movie, and WE'RE ACTUALLY DOING ACADEMIC WORK on the very last day of school when nobody walks in to see what an amazing teacher I am.

This year, Scholastic had Runaway Ralph on sale in one of their Reading Clubs for $1.  In January.  And I bought one for every student as an end of the year gift.  And then I felt very smug for the next five months, knowing that was already taken care of. ;)

So on the second to last day of school, I read the last chapter of The Mouse and the Motorcycle, and we got to the last page, and I read it and then closed the book.  There was a moment of silence, and then one little voice said, "That was a really good book."

And then another little voice said, "I don't want it to be over!"

Talk about a great segue.

So I said, "Yes, it was a good book, wasn't it?  Aren't you glad Beverly Cleary wrote it?"  Momentary pause for all the nodding and "uh-huh," and then I said, "Well, guess what?  She actually wrote THREE books about Ralph, and this was the first one, and for your end of the year present, I'm giving you the second one."

And I hauled out the Scholastic box that sat on my shelf for five months labeled "EOY 2016" and took out Runaway Ralph.


And I must say, I have NEVER had an end-of-the-year gift so excitedly received.

:)

But a book needs a bookmark, right?  So I made these for my kiddos:


And I explained that their name is on one end, with blue and gold beads (because blue and gold are our school colors).  The ribbons are blue and gold for the same reason.  At the other end is "my name" - and here I paused, and sure enough, one smart cutie said, "Because you like rainbows!" and a little moon charm because we learned about the moon in one of our science units.

Thus ended an awesome year.


Now it's summer, and we've been on our family vacation, and we've spent many evenings on the deck and eaten more burgers and hot dogs on the grill than in any summer ever, and my daughter has a killer sunburn from her first three days at camp this week, and we've had:

peas


and lettuce


and beans


and we're about to have tomatoes


and I no longer feel like this


So life is good.

How about you?

Saturday, January 16, 2016

And January!

Happy New Year!  

Late.  

Because that's how I roll.

(Sigh.)

December was a whirlwind (isn't it always) of wrapping up all the teaching stuff, shopping for gifts, Christmas, and a family trip to relatives in Canada.  So I've neglected this still-new-to-me (baby!) blog.  Perhaps I'll be able to get back on track and do a better job blogging this year?!

Time is always the problem.  That and the fact that by the time I get home from school, it's dinner time, and then - almost immediately - bedtime.  So very little (read: no) blogging (or anything else) gets done during the week.  Weekends are for catching up on sleep and on all the things I didn't do during the week.  So when do I get to work on this little blog?


Enter the 40 Hour Teacher Workweek Club.  The purpose of the club is to help teachers streamline what we do so that we can pare our work time down to 40 hours per week.  For those of us who spend far more hours than that at school - and then bring work home in the evenings and weekends - 40 hours is a dream.  A wild, seemingly unobtainable dream.  But apparently it can be done.


So I signed up to learn how.

Now, I think I've learned a few things during 20+ years as a teacher.  
  • First, I don't bring work home in the evenings.  (See above: there is no time to do it.)  
  • Second, I don't bring work home on the weekends.  I don't want to bring all those germy papers into my house (have you SEEN what second graders will do to their desks/noses/papers/mouths/pencils/noses/fingers?!), so grading gets done at school.  (Long ago, my grade level used to give a math quiz every Friday.  I used to grade those at home - or at my son's baseball games - on the weekend, and then return/review them on Mondays.  When our curriculum changed, we stopped giving Friday quizzes.  I loved NOT having those quizzes to grade on the weekends, and that's when I stopped bringing anything home to grade!)
  • Third, I don't do lesson planning at home.  All my materials for teaching are at school, so planning gets done at school.  (Side note: I LOVE planbook.com because writing those plans - or moving them from day to day - got a lot easier than keeping a traditional lesson plan book.  Especially since I can't read my own handwriting, so I've had to type my plans for years.)
  • Fourth, I grade like a fiend.  I don't use answer keys; I use the kids' papers and grade two or three against each other.  As I tell my students when they're "checking with a partner," "If your answers are the same, they're probably right.  If your answers are different, somebody's wrong!  Check BOTH people's work to figure it out!"  Grading doesn't usually take very long unless I let it stack up.
However, I'm at school most days until 5:30, 6:00, or later.  The kids leave at 3:40, my contract day ends at 4:00, and I'm there for at least another hour or two every day.  

I'd like to change that.

I'd like to be home before it gets dark in the winter, at least some days.

I'd like to be home in time to make dinner and not feel rushed.

I'd like to be able to stop at Target or the grocery store on the way home from school and NOT be in that mad right-before-dinnertime rush.

I'd like NOT to be the last one on my hallway to leave.

And I'd like NOT to have to make that long walk, in the dark, across the long blacktop to the last car in the deserted school parking lot most nights.  Because frankly, that's just scary.

So hopefully I'll learn a few tips and tricks.

Wish me luck!


Thursday, December 10, 2015

Five for Friday Success: Adding 2-Digit Numbers!


When we switched to the Common Core a few years ago, I had to rethink what I thought I knew about teaching addition and subtraction.  One of the things I thought was that kids needed to learn the algorithm for addition/subtraction (stack the numbers vertically, carry a one if adding, regroup/borrow if subtracting, voila) and practice it until they mastered it.

I thought they needed to learn it because, well, that's what the other teachers told me; because that's what I learned in my education classes in college; and because that's how I added and subtracted.

So that's what I did, and it mostly worked.

But then.

Oh my goodness.

The Common Core came along, and my district created guidelines for teaching (and sample learning tasks, and suggested lessons, and pacing guides, and and and and), and lo and behold, those sacred algorithms were nowhere in the second grade curriculum.  Or, as it turned out, the third grade curriculum, but I didn't realize that until my own daughter finally learned them - kind of as an afterthought - in fourth grade.  FOURTH grade.


But what was I supposed to do in second grade?

Well, as it turns out, I now do magic in second grade.  

Seriously.  Those "low," struggling math students who still need their fingers to add 4 + 2?  They will be adding 48 + 36 in their heads soon.  Those "I don't get it," "I can't do it," whines?  Gone.  Replaced with mentally solving 55 + 27 and answering confidently.

Here's how.


We began with base ten blocks.  I laid them on Elmo so they displayed on the Promethean board, and wrote the matching number sentence on a whiteboard.  

(Was I smart enough to take pictures?  No.  I'm still new enough to this blogging thing that I do NOT take pictures of the things I plan to write about later.  Brilliant.)

So I wrote something like "22 + 14" on the whiteboard, modeled it with base ten blocks, and we counted up the total.  Yawns all around. "This is so easy."

I spiced it up: "36 + 18," models, quiet and furious counting, shouts of the answer.

Five minutes, tops.

Because that was just the warmup, and now it was time for the meat.


Step one: use hands-on models and manipulatives.

Our warmup only lasted about five minutes or so because I want to get those tens rods and ones cubes into the kids' hands.  But I want them to model their answers in a very specific way.

They begin with a partner and a set of red and blue base ten blocks.  One partner uses blue to model the first number in the equation on a hundreds chart; the second partner uses red to model the second number on a different hundreds chart.  Here's what 45 + 33 looks like:


Then they slide the red number up to join the blue - it's adding time! 

But there's a problem:


We talk about how when we did the warmup, we would count all the tens and then count on by the ones.  In the blue/red model above, we're counting tens, then ones, then tens, then ones - and we've left a gap.  We know 93 is not the right answer - and the kids know that the red tens should go right after the blue tens.

So they slide those five blue ones out of the way and put the tens together first, then add the ones underneath.


Voila.  We are adding two-digit numbers.

I LOVE this strategy because 1) we can still see the two original numbers: 45 in blue, 33 in red; and 2) we are grouping the tens together and then grouping the ones together, so essentially the kids are learning to add the tens first - which is very efficient and much easier to do mentally than trying to visualize the algorithm and keep track of all those numbers!

Next, they record their answers on a smaller hundreds chart.  This step is crucial because it reinforces the "add the tens first, then add the ones" process.


(This sweetie was going for speed, not neatness . . .) :)

Now here's the fun part.  I made six pages of these problems.  There are eight per page (front and back).  But guess what?  Those kiddos find the shortcut pretty quickly. :)  

Day 1: work with a partner to model the numbers and add the blocks on a shared work space.  Record your answers on your own papers.

Day 2: work by yourself to model the numbers and add the blocks on your work space.  Record your answers.

Day 3: repeat. 
Unless you're one of those kids who asks, "Do I have to use the blocks?  Can I just color?" 

Teacher (grins to herself) asks the child solemnly, "I don't know.  Can you picture what the hundreds chart will look like when you model those two numbers?"

Child nods fervently.

"Can you color all the tens, then all the ones, in the right colors?"

Child nods fervently again.

Teacher says slowly, as if considering this idea for the first time ever, "Well, I don't know.  Why don't you do the first two problems and then come show me."

Child leaps away and returns moments later with correct coloring and answers.

Teacher studies the paper very seriously, murmuring, "I can see the red 42 and the blue 37 . . . yes, that looks good, and there's the correct answer in the blank . . . and on this problem I can see where you composed a new ten with all those ones . . ." Teacher looks at the student and says seriously, "It looks to me like you know what to do.  Will you do all the rest of the problems the exact same way?"

Child nods excitedly.

"Well, okay, you don't have to use the blocks today . . ." (As the child dashes away, Teacher does a very quiet happy dance.  Teacher WANTS the children to be able to visualize how the numbers will be added WITHOUT using the blocks, and now that one student has reached that point, Teacher knows that more will follow.  "Hey, he's not using the blocks.  Do I have to?"  Step one is almost complete.)

Days 4 and 5: repeat.  

If, on day 4, I still have children using the tens and ones blocks on their work space, then I'll call them over to work with me and ask, before they begin modeling, "Can you picture what it's going to look like when you color?"  The child always responds, "Yes," and I encourage him/her to "go ahead and color before you model."  Then we talk about how we can see the two numbers in their different colors - and we can see the final answer - and the child is elated that it took so much less time. :)
  
Day 6: send the final page home for homework!  By now the kids are so quick to color the tens first, and then the ones, and reach the correct answer, that I am confident they can complete this homework by themselves without any parent help.


Here's a preview of the packet:

You can pick up Adding with Base Ten Blocks in Two Colors on Teachers Pay Teachers for only $3.00!  What a steal! ;)


Step two: draw representations of the models.

Now that we understand the concept of adding tens and ones, we move to drawing our own tens and ones.  We start out on whiteboards and move to paper once I am sure that every child is setting up the problems just so.

And by just so, I mean, MY WAY.  Because I have reasons.  And if they don't do it MY WAY (which is logical and organized and reasonable), there will be confusion and mistakes later.

I've learned over time, you see.

We start by dividing our whiteboards into spaces tens and ones:


Then we draw the two numbers.  The first number (34) goes at the top of the whiteboard, tens on the left, ones on the right.

The second number (22) goes in the MIDDLE of the whiteboard.  


We count up what we've got on both sides, and voila, we're adding two digit numbers again.

MY WAY: Oh, you drew your tens too close together?  Erase and draw them again with at least a finger or two of space in between.  (Important when we get to subtraction later, so we start modeling it the right way now.)  Oops, you drew your numbers so big they filled up your whole whiteboard?  Erase and draw the first number at the top and the second number in the middle.  No, not at the bottom.  Erase and draw it in the middle.  The bottom should be blank.

(Geesh, this teacher is picky.)  
(Yes, I am.  Thank you.  Now draw it the right way.)

Sometimes we have to compose a ten, right?  So again, we draw the numbers at the top and in the middle:


And then we circle ten of those ones, draw an arrow over to the tens side, and draw our newly composed ten UNDER the other two numbers.  (Now the children begin to understand why they had to leave space under their second number!)

Last, we write the value of each side and put them together for our final answer.

Sometimes we talk about how the top number is the "red" number and the bottom number is the "blue" number, and about how that new ten is the two-colored tens row on the hundreds chart, because I want them to keep visualizing the tens grouped together and then the ones grouped together.  We'll also revisit "red tens" and "red ones" and "blue tens" and "blue ones" with our next strategy, so keeping that fresh in their minds is helpful.

We'll come back to these drawings when we subtract, but that's a post for another week. ;)


Step three: use a number line.

I don't know about you, but most of my second graders are not ready to jump into drawing their own number lines right away.  They need some structure and scaffolding first.

So I made them some number lines, and together we figured out how to add using the number line to help.


This student is working on a page from my Adding 2-Digit Numbers Using a Number Line.  It has five pages of Teacher's Notes (i.e. lesson plans) that model different ways to add using a number line. 

For example, we can:

  • Start at the first number and jump the tens and ones of the second number (start at the red number and jump the blue number);
  • Start at the second number and jump the tens and ones of the first number (start at the blue number and jump the red):
  • Start at the TENS of the first number and jump the TENS of the second number, then jump all the ones of both numbers (start at the red tens, jump the blue tens, now jump the red and blue ones);
  • and more.   

For some students, this number line idea is a challenging strategy.  After some specific teaching and practice, however, it's "easy-peasy," as one student told me earlier this week. :)

I made six front-and-back student pages (in the picture above, the child is working on the back of one of these pages) where the number lines are marked at the ones, fives, and tens.  These six pages give the students lots of practice trying out different addition strategies on the number line.

There are also six more front-and-back pages where the number lines are only marked at the tens (a nice segue into open number lines later in the year), which require a little more number sense and math strategy.


Here's the preview for Adding 2-Digit Numbers Using a Number Line . . .


 . . . but you might prefer to get the BUNDLE instead, which also includes Subtracting 2-Digit Numbers Using a Number Line AND Adding and Subtracting Two-Digit Numbers on a Number Line and, of course, saves you money!  I'll be writing more about how I use those packets in my classroom in future posts.


Step four: use a number line with only the tens marked, 
so that students have to use their number sense to add the ones.

Here's one of the Teacher's Notes pages for these six pages of number lines:


As you can see, there are many different ways to use the number lines to solve these addition problems!


An eventual step five: draw your own number lines!  We will use open number lines later in the year when working with 3-digit numbers, so sometimes I introduce the concept of open number lines while we're adding 2-digit numbers. 


And that's how we add in second grade.

Magic, I'm telling you.


Next week: subtraction!
  
Happy teaching!